Tuesday, December 16, 2008

Firefox Add-ons Featuring "Morning Coffee"


I am becoming more and more a fan of Firefox as each day passes. Firefox is a web browser that can easily be customized by incorporating a number of the add-ons available. I always knew these add-ons existed, but my awareness was increased greatly thanks to a staff college course presented by Dave Petersen and Brian Heineman.

Add-ons are small programs that you can add to firefox to increase the functionality of the browser. There are more add-ons than you can shake a stick at for sure. Periodically, I will feature one of my favorite add-ons in my blog. All of the tablets in our district have firefox installed, but if you do not have firefox, you can download it for free from http://www.getfirefox.com/. You can browse the multitude of add-ons here. There are many categories of add-ons ranging from functional to fun.

Today I would like to feature a simple add-on that I really like. It is called 'Morning Coffee'. You can customize this add-on so that it opens specific web pages in different tabs based on your preferences. For example, you can set it up so that it opens several web pages every day, or specifiy which days you want certain pages to open up when you click on the morning coffee icon. I have pages that I always want to check when I first go online each day. The idea of the name of the add-on is that these would be the web pages you would view as you enjoy your morning coffee. Kind of like the days when you sit at the kitchen table with the newspaper and your cup of joe. During the week, I like to check my email, lesson plans, and my online courses in Moodle. So, I have morning coffee set up to open these pages automatically when I click on the coffee cup. On weekends, I may like to look at other web pages, like my social networking pages, personal email, gaming sites, etc. You can set it up to display different pages based on the day of the week. I love it. Below is an image of Morning coffee.


You can download and install the morning coffee here. Hope you like it.

Thursday, December 11, 2008

Animoto

A few weeks ago, a friend of mine showed me a video she created online with Animoto. Animoto is a very easy to use tool to create high impact videos from still pictures. Essentially, Animoto does all the work. Once registered, you just need to upload your images through their online uploading tool and choose music. Animoto does the rest! You can choose music from their music library, or upload your own music to accompany your video. Generally, you can create as many 30 second videos as you like for free and 'full length' videos are $3.00 each. However, Animoto is FREE for educators. With an 'all access' pass, you can create as many full length videos as you like for FREE. You can then download the videos to your computer or post them online to a number of places (including a web page, blog, facebook, etc.

Check out Animoto and register for your free educator account and start creating impressive videos. You need to register through the educator link in order to receive the All Access Pass.

Wednesday, December 10, 2008

Some Moodle Resources

Have you joined the Moodle bandwagon yet? If so, I would like to provide you with some resources that I find valuable. I hope they help you to better utilize Moodle.

Resources:

Moodle Features Course (you must create a free account on Moodle.org in order to participate). The course provides an overview of all of the resources and activities and how to use them.

Moodle 1.8 User Manual: This comprehensive manual is a wonderful resource! It provides everything you could possibly want to know about creating a course, adding resources, etc. Think of it as the Moodle bible :) This is the newest manual available. We are currently using a newer version of Moodle, but until the manual is updated, this resource remains a valuable resource.

Moodle.org Teacher Documentation: This link will take you to a page geared toward teachers using Moodle. It includes links to sub pages that will assist you in using the many features of Moodle.
I will add additional resources as time goes on. I am a big fan of Moodle and am happy to answer any questions you may have.

Tuesday, December 9, 2008

Editing Sound Files with Audacity

Audacity is a free, open source audio editing tool. It allows you to create your own audio files or edit existing files. There are a number of built in effects that add to the usefulness of audacity.

You can download Audacity from: http://audacity.sourceforge.net/download/. It is available for Windows, Mac, and Linux. After editing the audio file, you can export it as a .wav file or an .mp3 file. The edited sound file can be used in Flash, PowerPoint, and a number of other applications.

If you would like to export the file as an .mp3 file, you need to also download an additional file (lame_enc.dll). Directions on how to install this as well as a link to the required file is available at http://audacity.sourceforge.net/help/faq?s=install&item=lame-mp3.

The video below will assist you with using Audacity to edit a sound file.

Monday, December 8, 2008

Google Documents


There are many collaborative writing tools out there. Among them is Google Documents. Basically, Google Documents is like having a web based Office application. However, better yet, is the fact that you can use them as a collaborative tool. In other words, you can create a document and share it with others. You can invite people to contribute to the document. You have the option to invite people to view the document or edit the document. In addition, you can share the document with the world by publishing it as a web page (google will host it) or posting it to your blog.

Google Documents currently allows you to create word processing documents, spreadsheets, presentations, online forms, and a variety of other documents based on templates they provide (holiday shopping list, budget worksheets, calendars, etc.). There are even a number of templates specifically designed for teachers and students.

Google Documents requires that you create a FREE google account. Your google account will also allow you to use any of the many free services offered by google including gmail (google's email), google calendar (I'll cover this one in an upcoming blog), and MANY MANY more!

I can see great applications for google documents in the classroom. For example, our 8th grade Social Studies students participate in a stock market project. They share a spreadsheet on our network (or transfer it on floppy disk) and update it using Excel. With a google spreadsheet, the students could access the document from any computer with internet access. Beyond this example, any group project or peer editing situation can benefit from the use of google documents.

Create your google account and get started today!

Friday, December 5, 2008

Did You Know?

Recently, I taught a staff college course entitled "Shift Happens: Joining the Conversation: Globalization and Preparing our Students for the 21st Century."

The course was based on the following video. This is the second official version of the "Did You Know" video, which provides some startling facts regarding the changes occurring in the world that we are preparing our students for. I believe you will agree that it is a great conversation starter. I hope that you can take eight minutes to watch the video. After watching the video, please post your comments or visit http://shifthappens.wikispaces.com to participate in the global discussion.


Thursday, December 4, 2008

Smart Notebook: Ink on ANYTHING with your Tablet PC


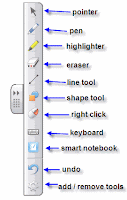
I don't know about you, but I am often frustrated when I cannot use my Tablet to annotate (ink) certain types of documents. Some programs allow inking (Word, Excel, PowerPoint), while others do not (Internet Explorer, Firefox, etc.). Well, my wife was good enough to set me on the right track. Smart Notebook (the software used with Smart Boards) works with the Tablet just as it would with a smart board. Thus, you can essentially ink ANYTHING. It essentially works as an overlay with a toolbar that is present on your screen. (see tooolbar to the right)

Some tips:
  1. The tool bar can be moved anywhere, but will typically be displayed on the left side of your desktop and will appear on top of any application running. You can hide it by clicking the double arrow on the 'tab' or move it by clicking and dragging on the group of dots under the double arrow.
  2. Once you choose a tool, that tool will take over for the mouse or the tablet pen. If you wish to return to the typical mouse functionality, choose the arrow tool.
  3. Once you have completed inking the document, you can take a 'screen capture', which will send the image to the smart notebook software.
  4. You can export the document as a .pdf file, an image file, or a variety of other formats. This will prove helpful if you would like to post the inked document on your website or Moodle site.
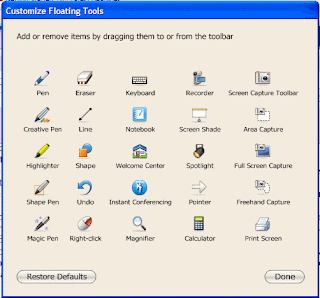
  5. You can add (or remove) tools from the toolbar, by clicking on the add remove tools button. This will open a screen (see below) that will allow you to drag new tools onto the toolbar or remove tools from the toolbar.


I suggest that you play around with a number of the tools above. I am sure there are a few that you will really like and use regularly. One certainly worth trying is the screen shade. This will bring you back to the old days of putting a piece of paper over your transparency to hide part of the content. As you pull the shade down, you will reveal whatever is underneath. This works great to keep kids from being distracted by looking at the entire screen when you want them to focus on a particular item. Feel free to share any of the tools you like as a comment to this post.

You can download the smart board software from the Smart Tech website. The 30 day trial is free. If you like it and would like to use the full version, let me know. I believe the school district has a site license for the software.

Enjoy!

Wednesday, December 3, 2008

CutePDF: Free PDF creator

CutePDF: Free PDF creator

Creating a .pdf (portable document format) is as easy as clicking file -> print with CutePDF writer. A .pdf file is the web standard for maintaining the integrity of a document of any type. You can create .pdf files out of your Word files, Excel Spreadsheets, Publisher documents, etc. Basically, any document that you can print, can be converted to a .pdf. The main benefit is that it is a universal file format that allows users to download the document exactly as the author intends for it to look regardless of whether or not the end user has the software it was created with. In addition, the end user cannot modify the document.

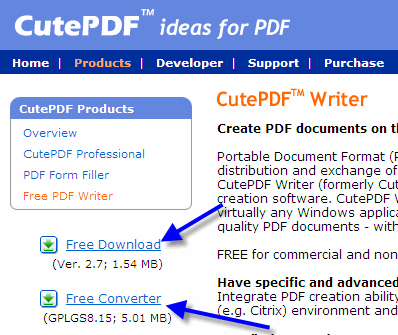
You can download the CutePDF writer AND converter (both are necessary) from : http://www.cutepdf.com/Products/CutePDF/writer.asp. When you get to the website, click on the two download links (see below).


Once downloaded, you will install both parts and you are ready to go. In order to create .pdf files, all you need to do is:
  1. Open the desired file
  2. Click on file -> print
  3. Choose CutePDF writer as the printer (it will be one of the printers in the pull down menu of printers)
  4. It will process your request and then bring up a save as window. Save the file wherever you like. It will save the file as a .pdf.
  5. Use the file as you like (email it, post it to your oncourse website, etc.)
Enjoy!

Tuesday, December 2, 2008

PowerPoint Show

Saving PowerPoint Slide Shows for Viewing on any computer

I get many questions regarding PowerPoint files and how to save them so that they can be accessed regardless of the version of PowerPoint on a given computer. Often, students create a PowerPoint presentation at home on a newer version and then come to school and cannot retrieve the presentation because the classroom computer does not have the same version. In addition, there are times when teachers post PowerPoint slide shows on Moodle and run into problems with the way the file is opened on the end user's computer.

Both of these issues can be resolved by saving the slide show as a PowerPoint Show. In order to do so, go to file -> save as -> and under save as type choose 'PowerPoint Show (*.pps)'.


When saved as a PowerPoint Show (.pps), the slide show can be viewed as a stand alone project. This means that the computer showing it does not need to have PowerPoint installed. You can not edit this file, so this is intended for times when you want to present the slide show, but not continue to work on it. For example, in Moodle, the presentation will load for the end user as a slide show. It will maintain all of the functionality (i.e. transitions, animation, etc) but cannot be altered. Likewise, when students (or teachers) save a presentation in this format, it can be shown as a slide show only. This should resolve some of the issues people are currently having.

When the slide show loads, it will load full screen and in order to advance, it will function like PowerPoint (i.e. you can click to advance or if it is set on automatic timing, the slide show will proceed as planned.